| TODAY'S RECIPE: Bistek (Beef Steak) | |
Blog Commentary: I was in the mood for some onions. So I decided to cook a dish that had A LOT of onions, Bistek! Even though we had red meat the day before, I was REALLY craving the onions. :-). I noticed that the recipe below was like the recipe for the marinade for the pork (w/o the vinegar).Without the vinegar, it gave a little bit of a sweeter taste. This recipe was a SUCCESS! The only thing I changed (from the original recipe) was the last couple of steps where I put the onions in with the sauce. It just looked too good to not give them a quick dip. Good stuff. Good stuff! Enjoy! I did. |
|
| Reference: http://www.recipezaar.com/Filipino-Beef-Steak-or-Bistek-243835 | |
ORIGINAL RECIPE:  |
JO'S RECIPE: |
BISTEK Ingredients |
BISTEK Ingredients |
|
|
| BISTEK Procedures: | BISTEK Procedures: |
|
|
VIDEO: |
|
| Video Commentary: I finally got to take a pic of the food! It's yummy. Hope you all like. Next: Yema Balls | |
Tuesday, June 30, 2009
Day 9- Bistek
Monday, June 29, 2009
Day 8- Pork BBQ
| TODAY'S RECIPE: Pork Barbeque | |
Blog Commentary: So I woke up hoping to find a macapuno candy that looked better than it did last night (I dunno, maybe it got better overnight as some dessert tend to do when they've settled and cooled off). No luck. It was still a gooey mess. So, I decided to make some bbq since we were going to a pool bbq later on that day anyway. I took the "?" in the ingredients as an indication of freedom. Actually, at first I thought it was supposed to be a 1 but then I started adding more to soak all the meat. I didn't have calamansi juice and used lemon juice as a sub. Instead of pork chop slices, I got some pork butt, which I struggled to cut but no problem. It was still cut. I got the hang of it towards the end whe I decided to use the butterfly technique on it. Also, I bought vinegar that already had peppers and some spice to the flavor so I left out the chillies out of my recipe. We took the pork to an outside grill but you can use a George Forman grill if you don't have access to an outside grill. Don't forget the salt and peppa!!! (<--- which I did...) |
|
| Reference: http://www.topvotedrecipes.com/Pork_Barbeque/456.html | |
ORIGINAL RECIPE:  |
JO'S RECIPE: |
PORK BBQ Ingredients |
PORK BBQ Ingredients |
|
|
| PORK BBQ Procedures: | PORK BBQ Procedures: |
|
|
VIDEO: |
|
| Video Commentary: I knew I shouldn't have gotten a manicure. So messy! And I also just wanted to go in the pool (it was freaking hot out), I was kinda rushing this bbq-ing process that I still have my rings on (in the vid) .... oopsies. The hubby wasn't too pleased about that. Oh yea, I would have salted and peppered the meat (while it was in grilling too). Would've been better. I think I'm gonna try to add some 7-up or sprite to this marinade in the future. Tip: Good to serve with hot sauce! :-) Next: Bistek | |
Day 7- Turrón
| TODAY'S RECIPE: Turrón (sweet fried bananas) | |
Blog Commentary: I was in a sweet banana, frying type of mood. The hubs and I decided to go grocery shopping to stock up on the filipino ingredients and actually asked someone who knew how to make a bananaque. You might remember my disastrous attempt to make a bananaque. I asked my mom what she used and she told me she used plantains. I guess you can use those too, but the recipe didn't require the plantains so I tried to find something that resembled a banana in the saba variety (not plantains). It was a little hard to cut. (I gotta get my Cutco chef's knife from back home). It was a little slippery. However, this turned out pretty well. It was a lumpia, part II type of experience.I'm think I'm good w/ the frying now. As you can see from below, the original author's recipe doesn't have measurements. I just tried to guess how much I needed when I made this. Oh, and I pan friend, instead of deep. A little longer, but I liked saving the oil. |
|
| Reference:http://www.nibbledish.com/people/lealea/recipes/classic-filipino-turon | |
ORIGINAL RECIPE:  |
JO'S RECIPE: |
TURRON Ingredients |
TURRON Ingredients |
|
|
| TURRON Procedures: | TURRON Procedures: |
|
|
VIDEO: |
|
| Video Commentary: This was such a fast cooking experience that I tried to doing ANOTHER dish afterwards as a bonus. a macapuno ball candy. The only recipe that I found was this one: http://www.filipinovegetarianrecipe.com/fruit_preserves/macapuno_balls.php which wasn't too helpful because I basically got a mush of sweetness in a big pot. So mad. So anyone out there that has a good step by step recipe, please comment!. Next: Pork BBQ | |
Day 6- Pancit Bihon
| TODAY'S RECIPE: Pancit Bihon | |
Blog Commentary: I tried making this dish because it seemed easy enough. This was my easy (and lazy) week so I decided to do a fairly simple recipe with A LOT of ingredients. As you will see in the video, I have no idea how to cut a cabbage. Looks easy, right? Wow. I said "easy" about 10 times already. Who am I trying to convince? No really, it's easy. Maybe I had the wrong knife or I'm just horrible at cutting. There are some premade mix (of cabbage and carrots) at your local grocery store, but I found this (even though it was poorly cut) cabbage and carrots mix very fresh and way better than any pre-made mix of these two veggies. So, I guess you can either take the hit (in the cuts) and you'll have a more flavorful dish. I liked it, but that's just me. |
|
| Reference: http://allrecipes.com/Recipe/Pancit/Detail.aspx | |
ORIGINAL RECIPE: 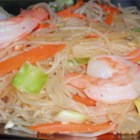 |
JO'S RECIPE: |
PANCIT BIHON Ingredients |
PANCIT BIHON Ingredients |
|
|
| PANCIT BIHON Procedures: | PANCIT BIHON Procedures: |
|
|
VIDEO: |
|
| Video Commentary: You probably notice the slight change of the use for the soy sauce. Truth be told, I forgot (whoa how about that, ME, FORGOT AGAIN) to drizzle the whole 1/2 cup of soy sauce unto the mix. This filming and cooking thing is harder than I thought. You tend to forget things when multitasking. ;-p. That's my story and I'm sticking to it. Anyways, I've seen my mom drizzle the sauce soy over the noodles as she was cooking it so I figured it be okay. Although, I did notice how dry the chicken and pork got without that extra sauce. Not too dry, just a little dry. However, the noodles did get more flavor though...You can add more sauce soy sauce within the recipe if you want. Your call. Next: Banana Turon | |
Friday, June 26, 2009
Day 5- Leche Flan
| TODAY'S RECIPE: Leche Flan | |
Blog Commentary: You may be wondering why I've been cooking deserts. Well, we're still working on the spaghetti that was cooked 3 days ago and I'm saving up for the other BIG meal tomorrow, pancit bihon! Weee. Flan wasn't too bad to make. It was pretty easy and there were a lot of videos that were already made. Didn't use aluminum mold but a baking dish and didn't place the pan on a larger baking dish filled with hot water. Also, the recipe called for water and sugar to make caramel but you don't really need water to make the syrup. I forgot to use foil until 10 mins into the baking. oops! However, I think it came out well! Still tasty. |
|
| Reference:http://www.filipinofoodrecipes.net/leche-flan.htm | |
ORIGINAL RECIPE:  |
JO'S RECIPE: |
LECHE FLAN Ingredients |
LECHE FLAN Ingredients |
For caramel:
|
For caramel:
|
| LECHE FLAN Procedures: | LECHE FLAN Procedures: |
|
|
VIDEO: |
|
| Video Commentary: Nothing really to commentate with the video. It's a pretty straight forward recipe.As you can see, I didn't flip over the flan. However, the caramel did rise to the top. It's probably prettier when flipped. Next: Pancit Bihon | |
Wednesday, June 24, 2009
Day 4- Puto
| TODAY'S RECIPE: Puto | |
Blog Commentary: Puto has always been my favorite morning treat. I remember visiting the Philippines about 10 years ago (that's the furthest my memory can go back) and waking up early in the morning to have the Puto person deliver the freshly steamed putos on banana leafs. Ahhh... that's a sigh not a frightened sound... I can still smell the freshness when I think about it. So I called my mom this morning to see if she could help me out in trying to get that flavor back. Basically, she just laughed at me (apparently, me trying to cook is pretty funny) and told me that she throws stuff in the pot, that she didn't use any recipe... psshhh, what a ridiculous concept. Oh mom... Back to the puto. No steamer so I decided to use the oven method they suggested on the website. Also, I didn't use the Edam cheese because I thought cheddar was better. I've always topped off my puto with cheddar so I figured it would work out. Also, I forgot to change the servings (yea, you can do that in the allrecipes.com website... I guess I was in a hurry). |
|
| Reference:http://allrecipes.com/Recipe/Puto/Detail.aspx | |
ORIGINAL RECIPE:  |
JO'S RECIPE: |
PUTO Ingredients |
PUTO Ingredients |
|
|
| PUTO Procedures: | PUTO Procedures: |
|
|
VIDEO:Okay, so I think I was supposed to just get the egg whites because the puto turned pretty yellowish and muffinish. It was not the puto that I remember. I mean the flavor wasn't bad at all, but it's just I didn't ask for a muffin. Maybe next time, I'll try another recipe and actually use a steamer... |
|
| Video Commentary: Next: Pancit | |
Tuesday, June 23, 2009
Day 3- Lumpia
| TODAY'S RECIPE: Lumpia | |
Blog Commentary: After seeing how much the blogger's emphasized on patience, I was a little hesitant to try this out. Patience has never been my strong suit. How can you go wrong with an eggroll? I've seen my mom do this a couple of times but I didn't get the recipe from her. Although, I do remember cabbage being one of the ingredients, I didn't use... saving that for the bihon. As you can see (below), this is the first time I didn't change the recipe! |
|
| Reference: http://hubpages.com/hub/Lumpia-Filipino-Egg-Rolls | |
ORIGINAL RECIPE: |
JO'S RECIPE: |
LUMPIA Ingredients |
LUMPIA Ingredients |
|
|
| LUMPIA Procedures: | LUMPIA Procedures: |
|
|
VIDEO: |
|
| Video Commentary: SUCCESS! Approved by a 4 men taste testing. I'm getting momentum... keep it up! Yep, I like motivating myself out loud.Next: Puto | |
Monday, June 22, 2009
Day 2- Filipino Style Spaghetti
| TODAY'S RECIPE: Filipino Style Spaghetti | |
| Blog Commentary: I decided to go with spaghetti since, spaghetti is probably the second easiest thing you can make and it would be really hard to screw up. It was a full proof way to get myself out of the the rut from the first recipe. I was half right. The recipe wasn't really too hard to follow as I've made spaghetti before. The only mistake I made, I think is that I got the whole wheat spaghetti (we had some leftover from a previous shopping trip). Hey! I'm trying to be healthy here. The sauce flavor was pretty good. The only downside to this was that the recipe was for a whole filipino family (including extended fam), plus our neighbors. I changed the recipe a little as the pot and wok were too small to hold that much sauce and water. Still, we had A LOT of sauce leftover. That's alright, I'll just use it for a sloppy joe (filipino style). Below are the ingredients from the site as well as mine. You can follow mine if you'd like to have leftovers (and forgot the cheese) or stick to the original recipe. Whatevs. I'll have another shot tomorrow: It's LUMPIA TIME! | |
| Reference: http://www.grouprecipes.com/29993/filipino-style-spaghetti.html | |
ORIGINAL RECIPE:  |
JO'S RECIPE: |
SPAGHETTI Ingredients |
SPAGHETTI Ingredients |
|
|
| SPAGHETTI Procedures: | SPAGHETTI Procedures: |
|
|
VIDEO: |
|
| Video Commentary: I don't know what to say. The hot dogs could've been in there for a little longer, maybe I could've turned up the heat and check on the hot dogs. I think we need more sugar too. It wasn't as sweet as i would've wanted it to be. Tip: taste the sauce and check on the hot dogs before serving. | |
Sunday, June 21, 2009
Day 1 - Bananaque...sorta
| TODAY'S RECIPE: Bananaque | |
| Blog Commentary: I figured I'd start with something easy, something small, with the fewest ingredients. This was the perfect dish. You may be wondering why there are 2 recipes on here. Well, I couldn't actually follow all the steps (even though there weren't that many), see explanation below. Forgot the skewers and got the wrong type of banana and filming got in the way so I ended up burning my first batch. Take 2, my take on the recipe. | |
| Reference: http://lutongpinoy.info/bananaque/ | |
ORIGINAL RECIPE: 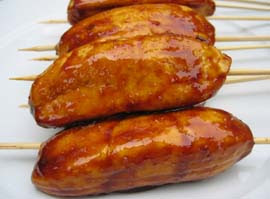 |
JO'S RECIPE: |
BANANAQUE Ingredients |
BANANAQUE Ingredients |
|
|
| BANANAQUE Procedures: | BANANAQUE Procedures: |
|
|
VIDEO: |
|
| Video Commentary: Wow. This was NOT a good start to this blog. I think there's a big emphasis on the type of banana to get. Should be ripe and of the saba variety. Hey! I picked the only semi-ripe (which some recipes said you can use.... although judging by my result, is NOT recommended) banana I saw in the asian supermarket. I'll make sure to ask next time. Also forgot the skewers. I brought them to a bbq 2 weeks ago and forgot to bring 'em home. Since I didn't have the skewers, I dunno if I could call this a bananaque, but as you can tell by my directions, I did a little of improvising based on the many times I've seen my mom do this deep fried banana recipe (I never knew what she called it). I found the term, bananaque, on the internet. I think she just called them sweet/sugar saging (banana). haha. I dunno, something was lost in translation. Also, everything ended up cooking the outside and the banana was very undercooked inside. That's why I changed the instructions to Medium flame. Live and learn. Next: Filipino Spaghetti | |
Introduction
I'm starting this blog for a couple of reasons.
Recently, I got married, quit my job, and moved across the country to finally be with my hubby after a year of flying back and forth (at least 1,000 mins a month on the phone and 3,o00 miles a month, to see each other for a short amount of time).
It's been a month since my move here and I figured, while looking for a job (or trying to create some of my own), I would try to do something that I've wanted to for a LONNNNG time. After our move here, we took most of our wedding gifts, which were mostly kitchenware, and I freaking finally learned how to cook! First attempt, a chicken curry (famous Indian cuisine) from a video from videojug (http://www.videojug.com/film/how-to-cook-a-chicken-curry-in-ten-minutes), wasn't too bad and encouraged me to keep trying and trying. Of course, not all of my dishes were as successful. The meringue didn't harden and the waffles got a little too much batter on them and didn't form the perfect circle (more like a cross between a circle and a square, a cirquare or a squircle). Anyways, that's when I realized I needed a hand mixer. Waffles are much better now... (still using Bisquick though, only recipe I know), but I think I'm gonna try a new recipe soon probably from allrecipes.com. Haven't tried to re-do the meringue again yet, but I'm ready for something new, something that's been daunting me for a long long time, filipino cuisine. I think it's ironic that making cuisine from my own country and culture, which I've eaten all my life, brings out more FEAR in me than anything else. I guess it's the pressure of screwing it up and embarrasing myself. Well, I think it's a good thing that I'm 3,000 miles away from family judgements and criticisms.
With that positive thought in my mind, I decided to go for it and committed myself to cooking 30 recipes in 30 days to go back to my roots and become (or at least try to) cook like a filipino. Two things will either happen a) I'll FINALLY learn to cook like a filipino and will have videos and recipes to pass down to my children as well as the WWW community b) I'll be reassured that even though I'm filipino, I'm better off cooking other cuisines in the world. So here goes...
Subscribe to:
Posts (Atom)